We told you about the Data recovery software that recovers your deleted data from the PC easily by paying a small amount for the software. Previously, it was having the version number 10.5 but now it comes with the version number 10.8 that comes with lesser number of bugs and fast ways to recover your lost important data from you PC. You can get a copy of the recovery software from the official EaseUS website and start using it from today onwards to recover your important data.

If you don’t know how to use the software to recover the deleted data then you can use the easiest option available in the software which is called hard drive recovery. The hard drive data is not that easy to recover. Because of the data remanence on the hard drive, some data continues to exist on the hard disk drive even after it has been deleted and you can easily recover that data with this software.
Here are the steps to do the hard disk data recovery with the EaseUS Data Recovery Wizard:
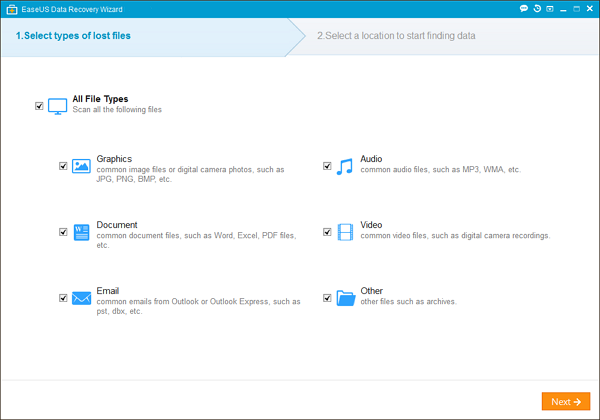
- In the first step, just launch the EaseUS Data Recovery Wizard and select the file types you want to recover and then click “Next” button.
- Now select the drive where you deleted the files or data and then click the “Scan” button and the software will now quickly scan the selected disk for lost data.
- After the scan is completed, you can preview all the deleted files that can be recovered with the software. Now click the “Recover” button to recover the selected lost files. Make sure you won’t save the data to the folder where the data loss was happened before as it might cause data overwritten.
Now you have successfully recovered the data with the help of this software. Checkout the following video to understand the hard drive recovery process easier.
For other recoveries, you can follow the steps below.
- Launch the Program and Start a Scan: in the first step, just download this software and scan the system and remember to install it in the disk where you haven’t lost any data.
- Next you have to select the documents type like Graphics, Audio, Documents, Videos, Emails and others.
- Select a Location to Start Finding Data: Next you can select a location to start finding the lost data, like desktop, windows libraries, hard disk drives, lost hard disk drives etc.
- Next you have to scan your computer to find the lost files and you can use the deep scan feature for a full system scan.
- Next after finishing the scan you can select the files you want to recover.
That’s it. Have fun recovering the lost files with this easy to use software.